When it comes to setting up a successful Facebook™️ ads campaign, the key is in the details.
Too many new advertisers jump the gun and start advertising too quickly without making sure their ad account is primed for success and profitability.
Before you do anything, you need to make sure you have the proper foundation.
Facebook™ Ads Foundation
Step #1
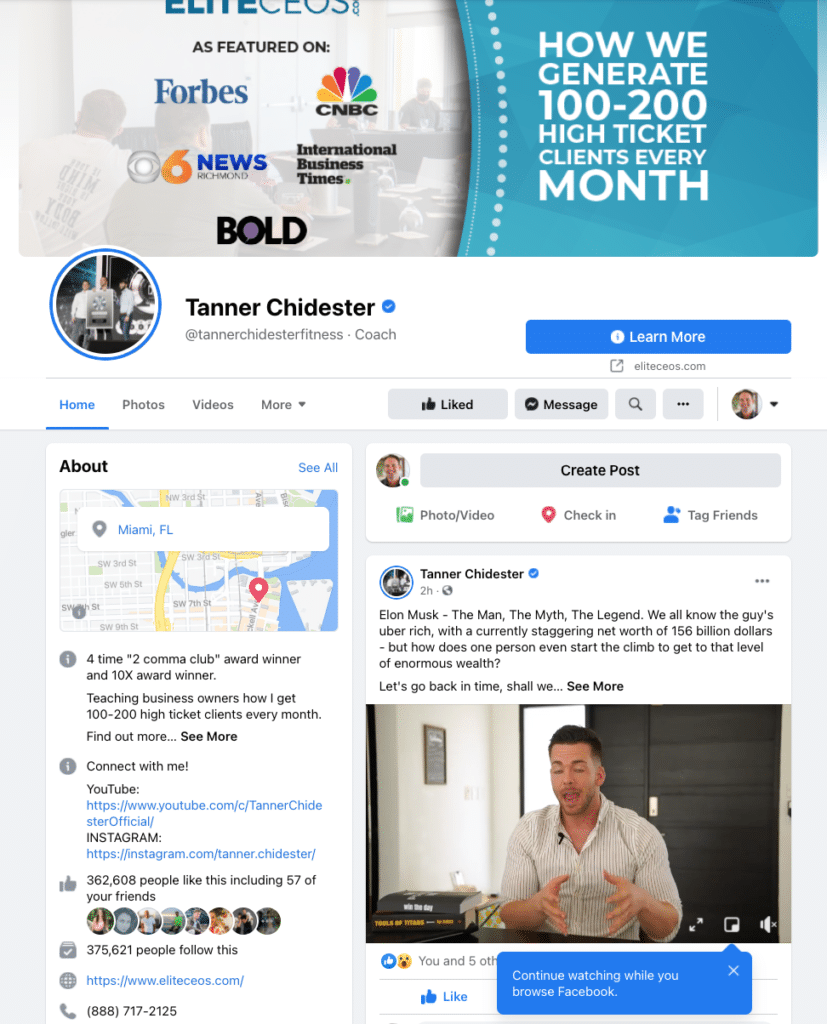
The first step is to create a business/fan page. Note: this page needs to be 100% legitimate. That means it needs to have all the proper information. It needs a phone number, legitimate website (that actually goes to a real URL that you own – not a subdomain page of clickfunnels or another page builder).
Once all of the important business information is filled out on the page add a few posts to the page over a 3 to 5 day period.
Invite a few friends to like the page and to like a few of the posts.
The key is to show Facebook™ that you’re a real business and not a scammer.
Here’s an example of what a legit Facebook™️ page should look like…
Step #2
Once your business page is created, now go to https://business.facebook.com and create a business manager for your ad account.
Do not try and run ads from your personal Facebook™ profile!
Note: make sure to verify your business manager. This will require you to submit proof of identity. Trust me, do this now because it makes dealing with support much easier if you have any problems down the road. Verification can take a few days.
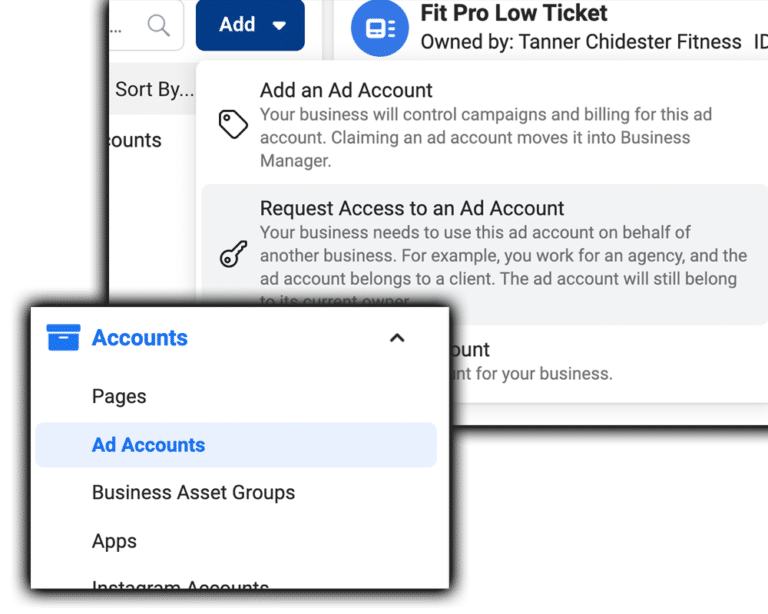
While you’re waiting for verification you can begin the process of setting up everything else. Inside the business manager you should add your page that you created above.
Then go to ad accounts, select “Add” and then select “Create a New Ad Account.”
Step #3
The next step is to set up your pixel. This is how Facebook™️ tracks all of your visitors to your page.
Inside the business manager, look under “data sources” and click on “Pixels”.
Then click the blue “Add” button and go through the process of creating the pixel.
The process seems to change every month with Facebook™️ so I’m not going to describe it in detail. Just follow the guided steps they give you, it’s pretty straight forward.
The key will be to follow the steps to get your domain verified (this will be the URL/domain you’re running your ads to).
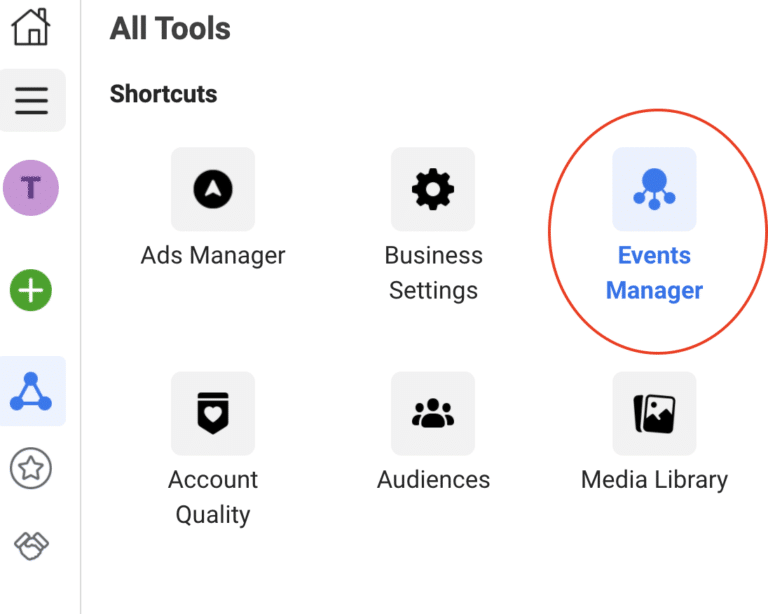
Once your pixel is created and you’ve followed the steps to add the main pixel and all your event pixels to your marketing pages/funnels, then you’ll want to go to your “events manager.”
Then click on Aggregated Event Management…
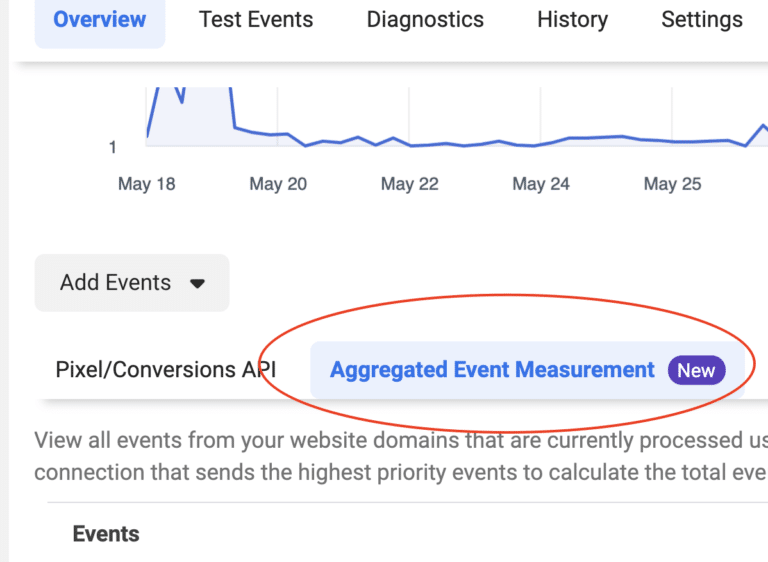
Now you need to make sure you add the necessary events for your funnel. For most people that includes “lead”, “purchase”, and some kind of application appointment event.
You’ll set these in terms of priority of what you’re most likely going to be optimizing for – which for most new ad accounts should be leads.
Before moving on be sure to run some tests and make sure all the pixels are tracking properly. Use the Facebook™️ Pixel Helper Chrome plugin to verify. Once you’ve installed the pixel helper go to each of your pages and verify that the lead, purchase and app confirmation pixels are firing correctly.
Setting Up Your First Facebook™ Ads Campaign
Before you move on to setting up your first campaign, it should be noted that I’m assuming you already know who your target market is, what their biggest pains and frustrations are, and what their ultimate goals and desires are.
If you aren’t sure about any of that then you aren’t ready to run ads on Facebook™️. You’ll just end up wasting a bunch of money.
If you’d like some help really dialing in on those things we actually have a pretty cool program called Elite Launch Academy that is designed to help new businesses create a solid foundation and offer.
But if you know your market and you’re ready to go, it’s time to get started.
Step #1
Open your ads manager and click the “Create” button.
This box will pop up…

Now, the odds are very good that your box that pops up may look a little different than this. Don’t panic, that’s just how Facebook™️ works. They like to change things weekly to keep advertisers on their toes.
I’m not going to get into great detail on all the campaign objectives. I’m just going to give you my opinion on a NEW ad account starting out.
My recommendation is to choose “traffic” when you’re just beginning.
Why? Because you haven’t told the Facebook™️ algorithm what a conversion looks like. You need to get to the point where you’re generating 50+ leads per week before you can start running campaign objectives with a conversion goal.
So stick with traffic when you’re just getting started. It will save you some money and help you get good data quicker.
Step#2:
Click continue and you’re on to step 2 where you’ll start to structure your campaign. I’d recommend naming your campaigns in a way that you can keep things organized. As you start to run more and more ads, you’ll have a lot of campaigns so naming them is important.
Usually I’d recommend including important details such as if it’s top of funnel, middle of funnel or bottom of funnel. Then the offer/angle you’re marketing and then perhaps your target market.
For example, if I were going to run a lead generation (top of funnel) campaign to pizza lovers in the US and Canada, using a free coupon, my naming structure might look like this: TOF | Free Coupon | Pizza lovers US & Canada.
Don’t worry about anything else on this page right now. The campaign budget optimization toggle switch should be “off” by default. That just means you’ll control your ad spend at the ad set level which is best for beginner advertisers anyway. So just leave it toggled off and click continue.
Step# 3:
Now you’re at the Ad Set level. This is where you’ll spend a majority of your time because it’s the most important (next to the ad and ad copy). This is where you identify who your ad is going to show up in front of.
Name the ad set specific to what you’re targeting. Example: Pizza Lovers | US & Canada | 18 to 32.
Scroll down to budget and set your budget according to what you can afford.
I’d recommend getting some results with your offer using organic strategies before running ads. This will help you determine what your target market thinks about your offer before you go and spend money to test it.
Our Elite Launch Academy teaches you exactly how organic marketing works (and paid ads too) in case you’re interested.
As you scroll down a bit you’ll see the targeting. This is where you select the countries and detailed targeting.
Note: I’d recommend testing running a campaign to the country you live in to begin. Then, once you’ve gotten some results you can just duplicate the entire campaign and change the countries.
Why not just lump them all together? Because I like to make sure I have a good idea of how effective my ad spend is for targeting so I like to break it up into separate campaigns.
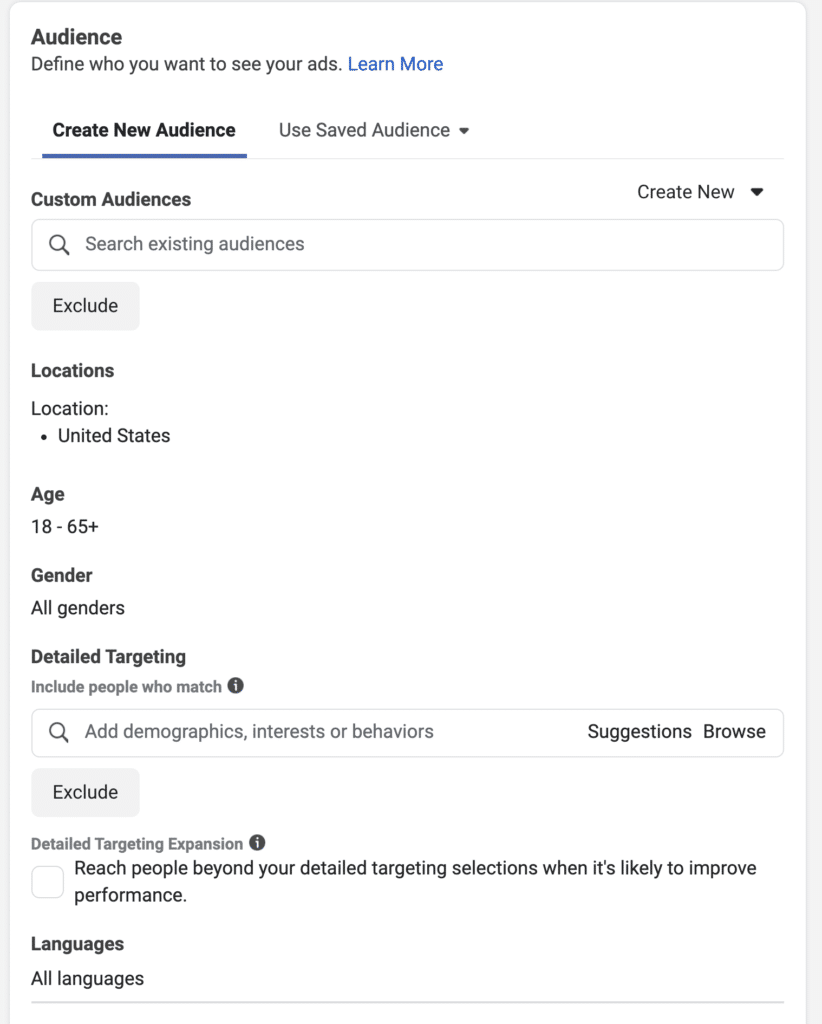
As for what to include in your detailed targeting. This is where your understanding of your target market comes in.
You need to know what your target market is interested in and how to reach them.
Your initial goal should be an audience size of 1 million to 5 million people. Go too big and you may end up getting too many bad looks. Go too small and Facebook™ won’t have enough to work with.
Unfortunately, I can’t tell you what to target.
I can tell you that layering is a good idea in the beginning to make sure you’re training your pixel with the best possible data.
For example, if I wanted to reach women 29 to 55 that were interested in weight loss then I’d target specific targeting options such as Jenny Craig, NutriSystem, etc.
But if I wanted professional women that had money (who could afford my fitness coaching program) I’d narrow that audience by saying that the audience must also match targeting interests such as Forbes, Inc.500, Investing, Merrill Lynch, etc.
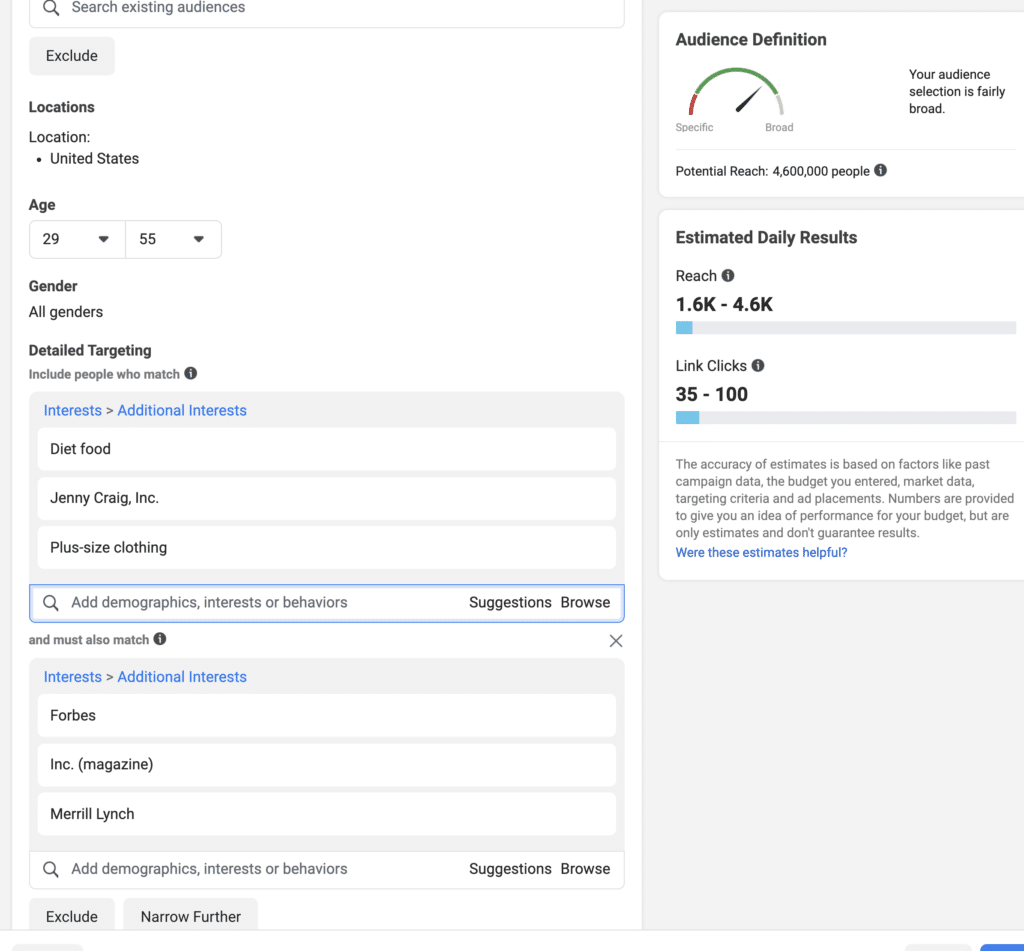
By doing this you’re telling Facebook ™ I want to target all women ages 29 to 55, in the US, that are interested in Diet Food, Jenny Craig, and plus-size clothing but they ALSO MUST MATCH: Forbes, Inc., or Merrill Lynch.
See how that gives me an audience of 4.6 million?
Don’t look at their estimated daily results. Those aren’t ever accurate.
I wouldn’t select Detailed Targeting Expansion as a new advertiser. Once your account has a lot of leads and good data in it you can try clicking that box but for now, leave it unselected.
You can leave “Automatic Placements” checked for now. This is just going to put your ad in more places. If you find that you’re spending money too fast you can try de-selecting it and just go for placements like newsfeed which will lower the exposure of your ad to just people’s newsfeeds.
For optimization & delivery make sure “Link Clicks” are selected. Click next to move on.
Setting Up Your First Facebook™ Ad
Now the most important part – the ad.
Why is it the most important part?
Because we live in a distracted society where people are bombarded with ads and some how you have to stand out.
You do this but truly understanding your target market and what they’re going through.
You’re going to need an image or video that resonates with them and your ad copy needs to reach them on a personal and emotional level.
Now, before I go on, let me be very clear. You absolutely must read through the Facebook™ Advertising Policies.
So many advertisers get their ad account shut down because they jump the gun and don’t take the time to understand what they can and cannot do.
Some simple things to stay away from: no income guarantees, no health claims or guarantees, don’t say “you” a lot in the ad copy, no foul language, don’t call out personal attributes (such as race, gender, etc.), don’t mention MLM or making money, no get-rich-quick schemes, etc.
In other words, if you use common sense you’ll be okay.
Below is my Elite Ad Framework that can give you a good overview of the components of an ad…

So, image or video?
Well, they both work. As of the time I’m writing this, we get the best results with video. However, images work too.
I’ll say this: if you’re good looking and comfortable in front of the camera then give video a try. If not, images are great to start.
But the images can’t be stock photos. They need to be high quality (royalty free) and they need to connect with your target market.
For example, if I’m trying to reach busy moms that want to lose weight (using the targeting I talked about above), I might find an image of mom with kids that is sad or exhausted.
A busy mom would look at that image and say, “That’s me!”
That’s what you want from your ad creative.
1. Call Out The Avatar – you don’t want the wrong people clicking your ad – so make it clear who the right people are.
For example,
“Busy moms, if you’re struggling to find the time…”
“Real Estate pros, if you’re having a hard time generating leads…”
“Fitness professionals, if you’re struggling to get and keep clients…”
2. Provide a solution to their problem.
Example:
“Busy moms, are you struggling to find the time to exercise and lose weight, don’t feel bad, you’re not alone.
Now more than ever moms have to be supermom and that’s just not fair.
The good news is we’re going to make it easy on you. We’ve created a program that takes just 10 minutes per day…”
3. Creative. We already talked about the creative but just a reminder – it has to appeal to your target market. What are the things they scroll through and look at on social every day? That’s what your ad should look like!
4. Headline. The headline should incorporate the lead magnet and hopefully incorporate solving the pain point.
For example,
Free MasterClass – How To Add 150 New Real Estate Leads Daily
Free Guide – 10-minute Workout That Sheds Fat Fast
5. Social Proof. An effective strategy is to create a post on your business/fan page, get a bunch of likes, comments, etc. organically and then when you go to create the ad just use the Post ID for the ad. You’ll instantly carry over all of the social proof from that post.
The only step now is to make sure all of your creatives match the dimensions where they’ll be displayed.
Be sure to upload specific dimensions for story ads, IG ads, newsfeed ads, etc.
There’s nothing worse than having an ad that clearly doesn’t belong on the platform.
So there you go, this is exactly how to set up a successful Facebook™ ad campaign.
If you’d like more detailed guidance, we actually have a course called Facebook™ Ads Academy that walks you through all of this.
In this training program you’ll also learn our secret strategy for converting more leads into buyers!
Learn more here: Facebook™ Ads Academy